Welcome
i3 Vertical's APIs are a suite of RESTful APIs that are easily consumed, nearly frictionless, and extremely fast. Our APIs allow you to:
- Create charges
- Refund charges
- Tokenize and re-use payment methods
- Manage customers and customer wallets
- Enroll merchants and provision payment accounts
API Access
Our APIs are publically available, and you can use the provided demo credentials to test the documented resources. Once you've decided to move forward, contact i3 Vertical's integration team to begin the integration process. You'll be provided your own sandbox, as well as a production environment.
API endpoints
Use the following hosts for all requests to our APIs.
Version 1
- Demo: https://demo-api.i3verticals.com/v1
- Production: https://api.i3verticals.com/v1
Version 2
- Demo: https://demo-api.i3verticals.com/v2
- Production: https://api.i3verticals.com/v2
Our APIs
Click on an API to view its documentation.
Customer API
The Customer API is used to manage customers and customer wallets.
Distribution API
Retrieve your payment distribution details with the Distribution API.
Document API
Store and retrieve documents attached to merchants with the Document API.
Enrollment API
The Enrollment API allows Partners to enroll Merchants and provision their payment Accounts.
Link API
The Link API provides a link shortening and tracking service.
Messaging API
The Messaging API allows Partners and Merchants to communicate with customers through various communications channels.
Payment API
The Payment API provides methods for processing payments and tokenizing payment methods. Access to the API can be limited based on various scenarios (tokenize-only, charge-only, etc).
Plugin API
The Plugin API provides UI plugin components that implement API functionality.
Session API
The Session API allows Partners allows the creation of a profile that defines a future end-user interaction such as accepting a payment.
Verify API
The Verify API makes verifying a contact method, such as a mobile phone number, simple.
How to Authenticate
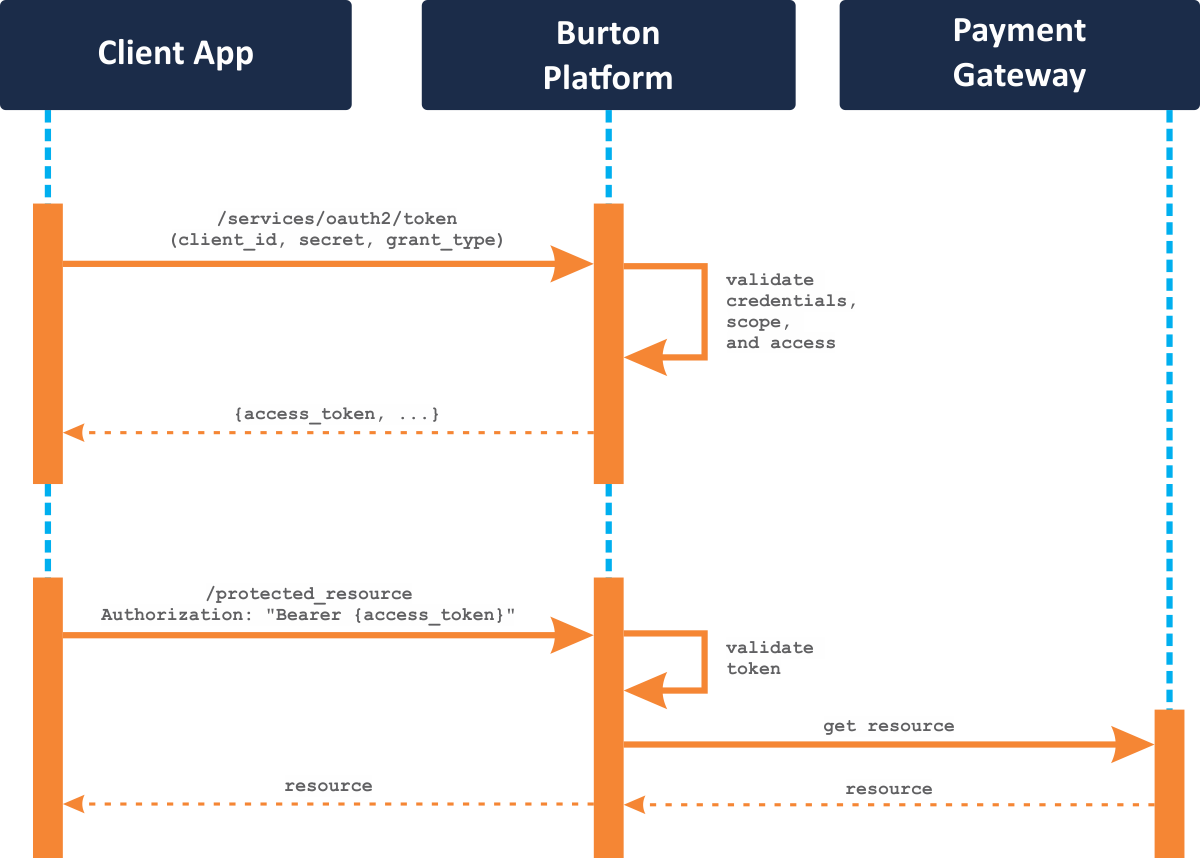
Our APIs use the Client Credentials OAuth 2 flow. A high-level overview of this process looks like this:

- Obtain a Bearer token from the server. Use the Client Id and Secret provided during the integration process with HTTP Basic authorization, and a grant_type of
client_credentials. - If your credentials are valid, the server will respond with an
access_tokenand some other detail explaining the granted access for the token. - Use the
access_tokenwith HTTP Bearer authorization for subsequent calls to protected resources within the Burton Platform's API. - Repeat this process each time you need a new
access_token.
CreateBearerToken request
The Client Credentials flow requires a few basic items in the authentication call:
- Use the appropriate Host URI for your integration and environment
- HTTP Basic authorization
- Use the
Client IDandSecretprovided during the integration phase as theusernameandpasswordvalues - If you're just testing in our public demo sandbox, use this value in place of the the Hashed Credentials text in the example:
aTJOMmRaSmRzTUNxZ3ZZakpEQnVlbUNwdGp2QmpHYWI6cEVNWDVBTmk4b2l5R3NSMA
- Use the
- A
grant_typein the body (x-www-form-urlencoded), with a value ofclient_credentialsgrant_type=client_credentials
- You must provide standard
Content-Typeheader, as wellContent-Type: application/x-www-form-urlencoded
- You may also specify a valid scope when requesting a Bearer token. Pass a space separated scope list in the
scopefield in the request body (x-www-form-urlencoded). This will limit the resources or actions the Bearer token is allowed. You can get a list of valid scopes by requesting a Bearer token without a scope. See the Scopes page for a full list of available scopes.grant_type=client_credentials&scope=urn:v2:charges:all
Putting these together, a cURL command would look like this.
curl -X POST \
  'https://$Host/services/oauth2/token' \
  -H 'Authorization: Basic HashedCredentials' \
  -H 'Content-Type: application/x-www-form-urlencoded' \
  -H 'cache-control: no-cache' \
  -d 'grant_type=client_credentials'
A successful response will have a response code of 200, and a body like this.
{
  "token_type": "Bearer",
  "access_token": "C6fgvWRISzNxA7MkVSk21XqdRN8O",
  "issued_at": 1550254644,
  "expires_in": 3599,
  "status": "approved",
  "refresh_token": null,
  "refresh_token_issued_at": 0,
  "refresh_token_expires_in": 0,
  "application_list": [
    "Payments",
  ],
  "scope": "charges read store_token create update delete refunds"
}
A few things to note:
- The
access_tokenis your token. - The
token_typevalue tells you the type of token. You can safely create your Authorization header using this template:{token_type} {access_token}(i.e. Thetoken_type, a space, and theaccess_tokenvalue). - The
issued_atvalue is the UNIX epoch when this token was issued. - The
expires_invalue tells you how many seconds afterissued_atthat the token will remain valid. If you use this value to determine when to retrieve a new token, allocate some buffer time to account for network travel. - The
scopevalue is a space-delimited list of scopes allowed for this token. If you didn't provide a scope value in your request, then it is also a list of the scopes allowed for your user.
Using the Bearer token
When making a request to a protected endpoint, populate your Authorization header with {token_type} {access_token}.
curl -X POST \
  'https://$Host/protected_endpoint' \
  -H 'Authorization: Bearer C6fgvWRISzNxA7MkVSk21XqdRN8O' \
  ...
Get Started
Read the following article that will help you get started quickly: